
Moving on from the success of the previous remake, Confuzion, wanted to hit the ground running on the second one Jumping Jack by Imagine Software, circa 1983.
While on the surface, this looks like a very simple game to create, there are a couple of things that make it ideally suited to the very particular hardware of the ZX Spectrum, and not so much suited to modern hardware and software. In particular, the way the “gaps” are handled. Reading through the instructions, it becomes clear that the platforms are fixed, and the gaps move through each platform, “punching a hole” in the platform effectively, and travelling up and down the stack of platforms as they go. This is very easy to implement in a system where the graphics are basically bitmapped, just alter the bitmap contents each frame for where the platforms are, or are not if there’s a gap, and that’s it. In modern systems, things are not bitmapped like this, everything is drawn as polygons, even simple sprites, so this led to some interesting experimentation to find the best way to even draw the platforms.
The first attempt was to draw a platform as a full width sprite, with a repeating texture, so that in time the platforms can look more interesting than a simple single colour rectangle, and then punch the gaps out using masks. Godot has the ability to use Light2D as a mask to do just this, and initial tests proved it to be very promising. However, I soon hit a limitation, it seems that there is no way to have multiple masks affect a single sprite, as soon as I added a second “gap” to a platform, it all broke, back to the drawing board.
The next idea was to actually process the gaps on each platform to work out where the visible parts of the platform are, and where the gaps are. This was relatively easy to implement, each gap is represented by a 2D vector and a width value, this can be turned into a Rect2D easily, build Rect2D’s for each gap on a given platform and then merge then where they overlap to give a list of Rect2D structures that represent each gap on the platform, from there it’s easy to work out what parts to draw, and what parts not to draw. Just need to work out how to draw it, again, multiple options available.
Godot has a good API for custom drawing of 2D nodes, with a quite rich set of
drawing calls, this can be used once at initialisation time, to effectively
draw what the node will look like and then cache it, or updated every frame.
One of the draw calls is draw_texture_rect which takes a texture and a
rectangle to draw. This kind of worked to begin with, however, it suffers from
a weakness, there is no way to specify the UV coordinates for each Rect2D. This
means the texture is always anchored to the top left corner of the rectangle.
Basically, as the hole moves along the platform, the texture will slide with
it, which is wrong, the platform should be static and the gap should move
through it.
Godot has some powerful tools for generating procedural meshes from code, so using the same Rect2 information from the processing step above, I can draw individual triangles into a mesh structure, with custom UV coordinates for each point, and have Godot draw that mesh. This does mean regenerating the mesh for every platform, every frame, but the size of the mesh, in terms of triangles and verties, is so small that this doesn’t appear to be an issue. We have a winner!
So the final method for rendering the platforms is to calculate the Rect2 for each gap, merge where they overlap, then draw a rectangle into a custom mesh for each region on screen between the gaps.
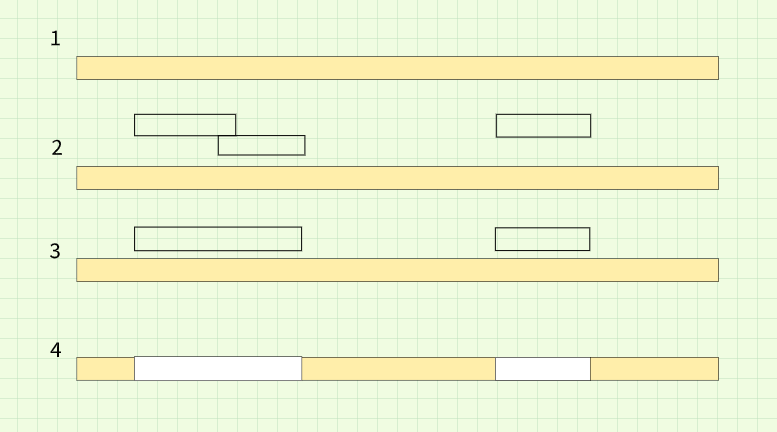
- The platform.
- The “gap” rectangles, note how the first two overlap.
- The gap list merged.
- The gaps overlaid on the platform, the mesh rendering code will just create rectangles for the tan areas, leaving the white areas empty.
The next problem was how to allow the player to jump through the gaps, I’ll cover that in the next post…